
Unit 12 Spatial Math: Graphic Representations
The numeric passage may be useful when an excessive number of numeric indicators are required in a graphic or math expression. The numeric passage indicator sets numeric and uncontracted modes until it is terminated by the numeric terminator. While in numeric passage mode, numeric indicators are not used, and letters a-j must have a grade 1 indicator to identify it as a letter. The passage indicator can be set on the line above a passage and the terminator on the line below the passage.
| Numeric Passage Indicator | ⠼⠼ |
| Numeric Passage Terminator | ⠼⠄ |
Horizontal line mode is a way to draw lines using braille cells to create diagrams, boxed material, number lines, graphs, and more. Basic guidelines and symbols are used to create the graphics. The following is a list of the simple line symbols that can be used to create graphics that commonly appear in print. A blank line is left above and below a spatial graphic or numeric passage.
| Horizontal Line Mode indicator | ⠐⠒ |
| Simple horizontal line segment | ⠒ |
| Corner upward | ⠚ |
| Corner downward | ⠲ |
| Vertical Line segment | ⠸ |
| Left leaning diagonal | ⠣ |
| Right leaning diagonal | ⠜ |
| Vertical line crossing | ⠺ |
| Horizontal line mode terminator | ⠄ |
Boxes and Diagrams
Each line must begin with the horizontal line mode indicator and is followed by the desired amount of simple horizontal line segments. Vertical line segments and corners are used for vertical lines. Diagonals are made using the diagonal line symbols. The print should be followed as closely as possible with transcribers taking the age and skill of the reading into consideration. Boxed items and diagrams are preceded and followed by a blank line.
Examples:
⠼⠼
⠐⠒⠒⠒⠒⠒⠒⠒⠒⠒⠒⠒⠒⠒⠒⠒⠒⠒⠒⠒⠒⠒⠒⠒⠲
⠸⠀⠀⠁⠀⠀⠸⠀⠀⠃⠀⠀⠸⠀⠀⠉⠀⠀⠸⠀⠀⠙⠀⠀⠸
⠐⠒⠒⠒⠒⠒⠒⠒⠒⠒⠒⠒⠒⠒⠒⠒⠒⠒⠒⠒⠒⠒⠒⠒⠚
⠼⠄
Number Bond Diagram
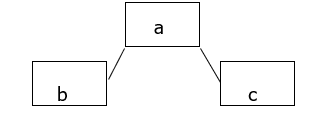
⠀⠀⠀⠀⠀⠀⠀⠀⠀⠀⠀⠀⠀⠀⠠⠝⠥⠍⠃⠻⠀⠠⠃⠕⠝⠙⠀⠠⠙⠊⠁⠛⠗⠁⠍
⠼⠼
⠀⠀⠀⠀⠀⠀⠐⠒⠒⠒⠒⠒⠒⠲
⠀⠀⠀⠀⠀⠀⠸⠀⠀⠰⠁⠀⠀⠸
⠀⠀⠀⠀⠀⠀⠐⠒⠒⠒⠒⠒⠒⠚
⠀⠀⠀⠀⠀⠀⠀⠀⠜⠀⠀⠣
⠀⠀⠀⠀⠀⠀⠀⠜⠀⠀⠀⠀⠣
⠐⠒⠒⠒⠒⠒⠒⠲⠀⠀⠀⠀⠐⠒⠒⠒⠒⠒⠒⠲
⠸⠀⠀⠰⠃⠀⠀⠸⠀⠀⠀⠀⠸⠀⠀⠰⠉⠀⠀⠸
⠐⠒⠒⠒⠒⠒⠒⠚⠀⠀⠀⠀⠐⠒⠒⠒⠒⠒⠒⠚
⠼⠄
Or
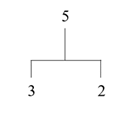
⠀⠀⠀⠀⠀⠀⠀⠀⠀⠀⠀⠀⠀⠀⠠⠝⠥⠍⠃⠻⠀⠠⠃⠕⠝⠙⠀⠠⠙⠊⠁⠛⠗⠁⠍
⠀⠀⠼⠑
⠀⠀⠸
⠐⠒⠒⠒⠲
⠸⠀⠀⠀⠸
⠼⠉⠀⠀⠼⠃
Number Lines
A number line can be represented by a horizontal line with left and right pointing arrows on either end. Vertical line crossing symbols mark the increments and numbers are written on the line below with the number sign lined up with the vertical line.
| Left pointing arrow | ⠳⠪ |
| Right pointing arrow | ⠳⠕ |
| Open circle | ⠽ |
| Closed circle | ⠿ |

⠳⠪⠐⠒⠒⠺⠒⠒⠒⠺⠒⠒⠒⠺⠒⠒⠒⠺⠒⠒⠒⠺⠒⠒⠒⠺⠒⠒⠒⠺⠒⠒⠳⠕
⠀⠀⠀⠀⠀⠁⠀⠀⠀⠃⠀⠀⠀⠉⠀⠀⠀⠙⠀⠀⠀⠑⠀⠀⠀⠋⠀⠀⠀⠛
Intervals
A horizontal line representing an interval is placed directly above the number line. It begins with horizontal line indicator and ends with an open circle.
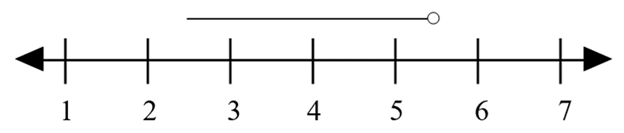
⠀⠀⠀⠀⠀⠀⠀⠀⠀⠀⠀⠐⠒⠒⠒⠒⠒⠒⠒⠒⠒⠒⠒⠽
⠳⠪⠐⠒⠒⠺⠒⠒⠒⠺⠒⠒⠒⠺⠒⠒⠒⠺⠒⠒⠒⠺⠒⠒⠒⠺⠒⠒⠒⠺⠒⠒⠳⠕
⠀⠀⠀⠀⠀⠁⠀⠀⠀⠃⠀⠀⠀⠉⠀⠀⠀⠙⠀⠀⠀⠑⠀⠀⠀⠋⠀⠀⠀⠛
This example begins and ends with a closed circle.
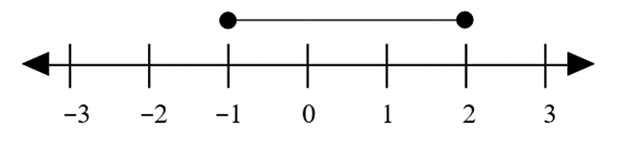
⠀⠀⠀⠀⠀⠀⠀⠀⠀⠀⠀⠀⠀⠀⠀⠿⠒⠒⠒⠒⠒⠒⠒⠒⠒⠒⠒⠒⠒⠒⠿
⠳⠪⠐⠒⠒⠺⠒⠒⠒⠒⠺⠒⠒⠒⠒⠺⠒⠒⠒⠒⠺⠒⠒⠒⠒⠺⠒⠒⠒⠒⠺⠒⠒⠒⠒⠺⠒⠒⠳⠕
⠀⠀⠀⠐⠤⠉⠀⠀⠐⠤⠃⠀⠀⠐⠤⠁⠀⠀⠀⠀⠚⠀⠀⠀⠀⠁⠀⠀⠀⠀⠃⠀⠀⠀⠀⠉
Tables:
Tables omit the boxed area in braille. The horizontal line indicator, followed by a horizontal line segment underlines the heading and extends the length of the table. Two spaces should separate the columns and numbers are justified right to line up under headings.
| x | y |
| 2 | 6 |
| 3 | 9 |
| 4 | 12 |
⠰⠭⠀⠀⠰⠽
⠐⠒⠒⠒⠒⠒
⠼⠃⠀⠀⠼⠋
⠼⠉⠀⠀⠼⠊
⠼⠙⠀⠀⠼⠁⠃
Spatial Math Regrouping Symbols
Cancellation and carryovers
When spatial math problems are presented as a means of teaching, they often contain regrouping marks. The previous learned line through previous item or "not" symbol (⠈⠱) is placed directly after the item to be cancelled. The new number or symbol is written directly above the cancelled number. When a number is shown carried to the column to the left, extra spaces should be placed between the numbers so that the carries number has its own column. Transcribers can use their own discretion when transcribing these problems.
Examples:
1.
⠼⠁⠲
⠼⠼
⠀⠀⠀⠀⠀⠙⠀⠀⠁⠃⠀⠀
⠀⠀⠀⠀⠑⠈⠱⠀⠃⠈⠱
⠀⠀⠐⠤⠁⠀⠀⠀⠙⠀⠀
⠀⠀⠐⠒⠒⠒⠒⠒⠒⠒⠒
⠀⠀⠀⠀⠉⠀⠀⠀⠓⠀⠀⠀
⠼⠄
2.
⠼⠃⠲
⠼⠼
⠀⠀⠀⠀⠁⠀⠀⠀⠀
⠀⠀⠀⠀⠀⠑⠀⠋
⠀⠀⠐⠖⠀⠁⠀⠙
⠀⠀⠐⠒⠒⠒⠒⠒
⠀⠀⠀⠀⠛⠀⠀⠚⠀
⠼⠄
3.
⠼⠉⠲
⠼⠼
⠀⠀⠀⠀⠀⠀⠀⠀⠀⠀⠀⠀⠀⠁⠀
⠀⠀⠀⠀⠁⠀⠀⠀⠀⠀⠀⠀⠆⠈⠱
⠀⠀⠀⠐⠒⠒⠒⠀⠐⠦⠀⠐⠒⠒⠒
⠀⠀⠀⠀⠙⠈⠱⠀⠀⠀⠀⠀⠀⠑
⠀⠀⠀⠀⠀⠃
⠼⠄